


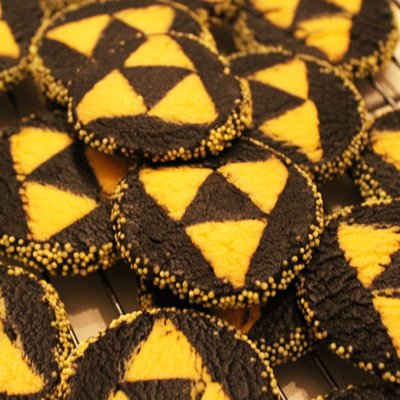
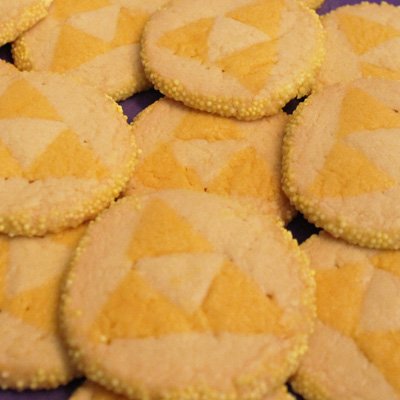
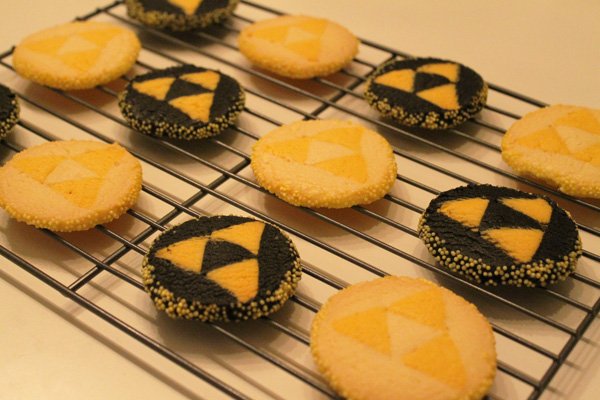
A little more complicated, but definitely fun, version of these cookies from a while ago. Although I myself am not a big fan of Legend of Zelda, I do know a lot of Legend of Zelda fans, which is why I made this Triforce cookie recipe. These sand cookies are wonderfully light and thin.
As a collaboration between AVO Blog and MuchMunchies I love to share recipes with a Japanese side to them, but these are not my only recipes.
[youtube https://youtu.be/ZWE2ox0B0-8]
Difficulty level: ✩✩
This is based on the pretty long preparation time (not including waiting time in between), the simple to make cookie dough recipe and the amount of steps you need to follow to create these cookies.
What you’ll need:
♡ Electric Mixer + Dough hooks
♡ Big Mixing bowl
♡ Clingfilm
♡ Small Pastry brush
♡ Baking paper
♡ Rolling Pin
♡ Fondant ball tool (or something comparable to get the cookie dough out of the cookie cutter without deforming it)
♡ 1 or more Silicone Spatulas
♡ 1 Small triangular cookie cutter*
♡ Stack of paper or a Rolling Pin Ring of 1,5 centimetres thick
♡ Optional: Silicon baking mat
♡ Optional: Bowl or square dish to put the yellow nonpareil sprinkles in.
*My cookie cutters was 2,9 centimetres in height. The small triangle had a height of 1,9 centimetres. You can measure the height of the triangle by measuring the distance between the top of the triangle and the middle of the horizontal line.
Ingredients:
♡ 180 grams of butter (I always use butter, meant for baking cakes, that doesn’t contain soy or lactose, but you can use normal butter, for baking cakes, instead.)*
♡ 140 grams of powdered sugar
♡ 300 grams of flower
♡ 2 egg yolks*
♡ 1 teaspoon vanilla extract
♡ Yellow food colouring, powder or gel
♡ Egg wash: 1 egg white* mixed with 1 teaspoon of water
♡ Optional: Black food colouring, powder or gel
♡ Optional: Yellow nonpareil sprinkles**
* These ingredients need to be at room temperature, not cold from the refrigerator.
** You’ll need quite a bit of these, at least 50 grams, in a bowl that is about as big as your roll of cookie dough.
Method
TIP: Scrape the sides of the bowl well in between with the silicone spatula, during steps 1 through 3, so everything gets incorporated well.
♡ Step 1: Whip up the butter with an electric mixer. Add the powdered sugar little by little and mix this until it is well incorporated.
♡ Step 2: After this add the egg yolks and the vanilla extract, mix this through well again.
♡ Step 3: Now add the flower and mix it all well.
♡ Step 4: Divide the dough into two equal parts. Colour one part yellow with yellow food colouring. The other part you can leave uncoloured, or you can colour it black with black food colouring.
♡ Step 5: Wrap the cookie dough in some clingfilm and put this in the refrigerator, let the dough cool in the refrigerator for an hour.
♡ Step 6: Roll out the yellow dough, on a baking mat or piece of clingfilm, to the right thickness. You achieve this by putting two stacks of paper of a thickness of 1,5 centimetres on each side of the dough and rolling the rolling pin over this. Instead of this you could also use a rolling pin ring of 1,5 centimetres thick.
TIP: To get the small triangles out of the cookie cutter you can use a fondant ball tool, so they won’t lose their shape. Press this into the middle of the cookie dough in the cookie cutter.
♡ Step 7: Cut out triangles from the dough, using the small triangular cookie cutter. Put these aside, cut out as many as possible. Put these triangles in the refrigerator until you’ve finished up your yellow cookie dough, as much as possible.
♡ Step 8: Kneed the leftover yellow dough into a ball again, repeat steps 5 through 7 for this dough.
♡ Step 9: Once you’ve cut out as many yellow triangles as possible, divide those into three groups. Stick the yellow triangles of cookie dough together, to make them stick brush some egg wash on them using a small pastry brush. Eventually you should end up with three rows, existing of stuck together yellow triangles of cookie dough, that are all the same length. Put these in the refrigerator.
♡ Step 10: Take the uncoloured, or black if you coloured it black, dough out of the refrigerator. Roll out the dough, on a baking mat or piece of clingfilm, to the right thickness. You achieve this by putting two stacks of paper of a thickness of 1,5 centimetres on each side of the dough and rolling the rolling pin over this. Instead of this you could also use a rolling pin ring of 1,5 centimetres thick. Cut little triangles out of this dough, as many as there are in one row of yellow cookie dough.
♡ Step 11: Take the three yellow rows of cookie dough out of the refrigerator and stick a row of uncoloured or black cookie dough triangles, upside down, to one of the yellow rows of cookie dough. Brush some egg wash on them using a small pastry brush. You stick the other two rows to them in the same manner, to create a Triforce. Wrap the whole thing in clingfilm and put this in the freezer, for about 10 minutes or until the dough has become hard.
♡ Step 12: Leave the leftover uncoloured or black cookie dough outside of the refrigerator, but make sure to wrap it in clingfilm.
♡ Step 13: Take the cookie dough out of the freezer as soon as it has hardened. Stick the leftover uncoloured or black cookie dough to the, by now hardened, long piece of Triforce cookie dough. Roll this back and forth over a baking mat or clean surface until it has become a nice cylinder shape. Wrap this in clingfilm and put it in the refrigerator for about an hour to cool.
TIP: If you didn’t buy any yellow nonpareil sprinkles then skip part 14 and continue to step 15.
♡ Step 14: Put the yellow nonpareil sprinkles in a bowl or square dish that your cylinder shaped cookie dough fits into. Take the cylinder shaped cookie dough out of the refrigerator and brush some egg wash onto it, don’t brush it onto the sides. Dip it into the yellow nonpareil sprinkled, make sure you turn it around well so the entire cookie dough will be covered, except for the sides. Wrap the cylinder shaped cookie dough in some clingfilm again. Put this in the refrigerator for half an hour, to make it a bit firmer again.
♡ Step 15: In the meanwhile preheat your oven to 180 degrees Celsius.
♡ Step 16: Take the cylinder shaped cookie dough out of the refrigerator and cut cookies off of it, cut them about 3 millimetres thick. Unfortunately my cookies were a bit thicker, if that happens you’ll have to bake them a little longer. Place the cookies on a baking tray that’s covered with baking paper. If they’ve lost their shape a bit from cutting them you can use your fingers to gently push them back into the right shape.
TIP: Some recipes claim that if you put the cookies in the refrigerator one more time, for about an hour, at this point in the process that they would keep their shape better. I never do this, because I’ve never noticed a difference In result between the cooled and the non-cooled cookies, but if you think it’ll help: Then do cool them.
♡ Step 17: Bake the cookies for about 10 minutes at 180 degrees Celsius. When they’re done you’ll see a little bit of golden brown colouring on the bottom or sides of the cookies.
♡ Step 18: Let the cookies cool completely, otherwise they fall apart when you pick them up or move them.
♡ Enjoy!
These cookies take quite a bit of time to make, but the result is fun. And for Legend of Zelda fans they are a nice surprise!
Don’t forget to like MuchMunchies on Facebook and subscribe to MuchMunchies’ channel on Youtube for more pictures, videos and recipes!


