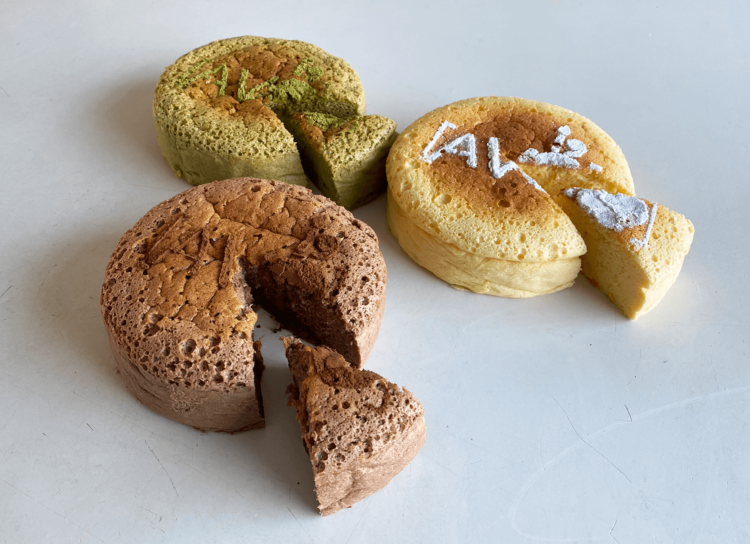
Happy 19th Birthday AVO Magazine! It’s been five years since I made an AVO related recipe, so it was definitely time for another one. So here are some delicious Japanese Cheesecakes: original, matcha and chocolate flavoured.
This recipe is a collaboration between AVO Magazine and MuchMunchies.
Difficulty level: ✩✩
The process of making this cake includes cutting a template out of acetate and whipping up egg whites.
What you’ll need:
♡ Template
- AVO’s 19th Birthday Template
- Acetate Sheet
- Sharp Knife
- Cardboard
♡ Japanese Cheesecake
- Cake Tin (15cm diameter)
- Big Deep Cake Tin
- Baking Paper
- Electric Mixer + Whisk Attachments
- 2 Big Mixing Bowls
- Heat Proof Bowl
- Silicone Spatula
- Cooling Rack
- Sieve
Ingredients:
♡ Template
- Powdered Sugar
- Matcha Powder
- Cocoa Powder
♡ Japanese Cheesecake (for each cake)
- 4 Egg Whites*
- 25 grams of Granulated Sugar
- 4 Egg Yolks*
- 25 grams of Granulated Sugar
- 90 grams of Cream Cheese
- 30 grams of Butter
- 30 grams of Milk
- 30 grams of Flour
- Optional: 6 grams of Matcha Powder OR 6 grams of Cocoa Powder
Method
♡ Step 1: Preheat your oven to 160 degrees Celsius. Pour water into a deep cake tin, filling about 1/3rd of it with water. Make sure the tin is big enough to fit the smaller cake tin you’ll bake the cake in.
♡ Step 2: Place the deep cake tin, with water, into the oven.
♡ Step 3: Brush the inside of your smaller cake tin with butter. Line it with baking paper.
♡ Step 4: Place the butter, milk, cream cheese and 25 grams of sugar into a heat proof bowl. Warm this mixture until the butter has melted and the sugar has fully dissolved.
♡ Step 5: Once the butter has melted mix well. Then add in the egg yolk and mix for about three minutes with an electric mixer.
TIP: If you’re making one with matcha or cocoa flavour, whisk together flour and matcha powder or cocoa powder.
♡ Step 6: Sift the flour mix on top of the egg yolk mixture. Mix until well combined.
♡ Step 7: Whip up the egg whites with 25 grams of sugar. Whip until the egg whites reach a stiff peak consistency.
♡ Step 8: Gently fold the whipped egg whites into the egg yolk mixture, in three additions.
♡ Step 9: Pour the cake batter into the prepared cake tin.
♡ Step 10: Place the cake tin into the water bath in the preheated oven.
♡ Step 11: Bake for about 50 to 60 minutes. These cakes are done once the top is slightly browned and there is no raw batter showing.
♡ Step 12: Remove the cake from the oven and let the cake tin fall on your counter. Run a knife alongside the edges and tip out the cake, then place it on the cooling rack to cool completely.
♡ Step 13: Tape the template onto a piece of cardboard, then lay the acetate on top. Tape the acetate into place and carefully cut out the design.
♡ Step 14: Place the acetate, with the design cut out of it, over the cooled cake. Sift over some powdered sugar, cocoa powder or matcha powder.
♡ Step 15: Gently remove the acetate, making sure not to distort the design.
♡ Enjoy!
Although I made these to celebrate AVO’s 19th birthday, you can definitely make these for any occasion. Enjoy them as they are, or with some fresh fruit and whipped cream.
Don’t forget to like MuchMunchies on Facebook and subscribe to MuchMunchies’ channel on Youtube for more pictures, videos and recipes!
Big thanks to @deathy for suggesting Japanese Cheesecake on our discord server!


