


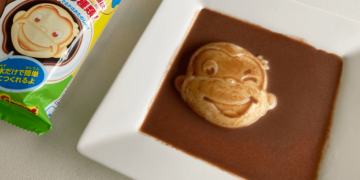
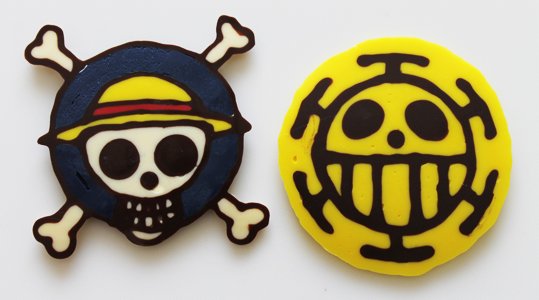
One Piece is a pretty popular series, although I’ll admit I’ve only seen very few episodes of it. But my friends like the series a lot and that’s why I came up with this recipe, which I made for one of their birthdays. As a collaboration between AVO Blog and MuchMunchies I love to share recipes with a Japanese side to them, but these are not my only recipes.
I’ve chosen to make chocolates, but you can also make these with royal icing.

Difficulty level: ✩✩
This is based on the long preparation time (not including the waiting time in between), the fact that I don’t temper the chocolate and the amount of steps there are to this recipe. Tempering chocolate can be hard for some people so this would add another star.
What you’ll need:
♡ Template (Link)
♡ 2 Cutting boards, about the size of a A4 piece of paper
♡ Baking paper or Acetate (8cm high, not any smaller)
♡ Small or Barbecue skewers
♡ 1 Sauce pan (with a slightly smaller diameter than your glass bowl)
♡ 1 Glass (heath proof) bowl
♡ 1 or more silicone spatulas
♡ 5 (disposable) Piping bags (or 1 piping bag which you clean and dry well in between)
♡ Optional: 1 Small Piping nozzle (for example Wilton tip 1)
Ingredients:
♡ Black Chocolate
- 80 grams of Dark or Milk Chocolate (I use lactose-free chocolate, you can also use rice milk, soy or regular chocolate)
- Optional: Black Food colouring powder (No Gel food colours, you could use oil based food colours if you wanted)
♡ Yellow Chocolate
- 100 grams of White Chocolate (I use lactose-free chocolate, you can also use rice milk, soy or regular chocolate)
- Yellow Food colouring powder (No Gel food colours, you could use oil based food colours if you wanted)
♡ White & Red Chocolate
- 50 grams of White Chocolate (I use lactose-free chocolate, you can also use rice milk, soy or regular chocolate)
- Red Food colouring powder (No Gel food colours, you could use oil based food colours if you wanted)
- Optional: White Food colouring powder (No Gel food colours, you could use oil based food colours if you wanted)
♡ Blue Chocolate
- 40 grams of White Chocolate (I use lactose-free chocolate, you can also use rice milk, soy or regular chocolate)
- Blue Food colouring powder (No Gel food colours, you could use oil based food colours if you wanted)
The dark or milk chocolate could be replaced with white chocolate, if you prefer, but then you would have to use black food colouring powder to make it black. You might have a little bit of melted chocolate left once you’re done, you can spread this on a cutting board with a piece of baking paper on it and put it in the fridge so you can eat it later.
Method
TIP: You can choose between baking paper or acetate strips with a height of at least 8 centimeter. Baking paper has a tendency to curl up and might not remain flat once you start piping the chocolate onto it. Baking paper doesn’t give the prettiest result, because where the chocolate touches the paper will become the front of the chocolates in the final result. Acetate is meant to be used when making chocolate decorations, it’ll give you a smoother result.
In this recipe I don’t temper the chocolate, which means that the chocolate won’t remain solid at room temperature, but will start to melt. If you do want your chocolate to stay solid at room temperature you can find several good methods for tempering chocolate online. The reason I didn’t temper my chocolate was the weather: When it’s very warm chocolate melts faster and the temperature of my house was around 26 to 28 degrees Celsius.


TIP: If you’re using a piping nozzle you can check to see if it’s right by looking if the hole of the nozzle is slightly smaller than the thickness of the lines on the template. The hole should not be any bigger.


Preparation: Put the template on a cutting board and tape it down. Place some baking paper or acetate over it and tape it down at the back of the cutting board.


Cut the chocolate into small pieces, if you’re using chocolate bars. If you’re using chocolate melts then the pieces are usually small enough.


You can prepare your piping bag ahead of time. The best way to do this is to cut the end off of the bag, put the piping nozzle in the piping bag and then put the piping bag in a glass or measuring cup, folded open over the edges. You don’t have to use a piping nozzle, if you don’t then you keep the bag whole put it in a glass or measuring cup, folded open over the edges. You cut off the tip right before you start piping the chocolate.
TIP: Make sure you have plenty of space in your refrigerator!


♡ Step 1: Put the dark or milk chocolate in a glass bowl, put the bowl on top of a pan with a small layer of water in it. The bowl with the chocolate in it should not touch the water, because this could easily burn your chocolate. Bring the water to a very slow simmer on a small burner. Use a silicone spatula to carefully stir the chocolate from time to time, until the chocolate has fully melted. If you stir too vigorously you will create air pockets in your chocolate. Once the water comes to a boil you can turn off the fire, the bowl keeps the warmth trapped so the chocolate will still melt.
TIP: This method is called au bain-marie, but instead you could also melt your chocolate in the microwave. If you want to use a microwave then you put your chocolate in a heath proof bowl, put these in the microwave and put it on a high setting. Turn it on for 20 to 30 seconds and then take out the chocolate and stir it carefully. Afterwards you put the chocolate back in the microwave for 20 to 30 seconds. You keep repeating this process until the chocolate is fully melted, at the end of this the amount of time you need will be shorter (as little as 5 seconds). Stirring it in between is meant to prevent the chocolate from burning.
♡ Step 2: Take the bowl off of the pan and dry off the bottom with a kitchen towel. Put the bowl on the counter or on a coaster on a table. Be careful when taking the bowl off the pan because of the hot steam escaping and the hot glass bowl.
♡ Step 3: If you want to you can now add the black food colouring powder and stir this through the chocolate carefully. Put the chocolate into a piping bag with a small piping nozzle in it, after achieving the desired colour.


♡ Step 4: Pipe the outlines for both designs on the acetate or baking paper. Take your time and don’t put too much pressure on the piping bag, because if you do too much chocolate might come out. Put the cutting boards in the refrigerator and wait for the chocolate to set. In the meantime clean the piping nozzle, if you only had one, and dry the piping nozzle with some kitchen paper. You can prepare your next piping bag, in the same fashion you did before, ahead of time.
♡ Step 5: As soon as your chocolate has set you can start on the next colour. Yellow is the easiest, since one of the chocolates only consists of the colours black and yellow. Put the white chocolate meant for the yellow parts in a glass bowl, put the bowl on top of a pan with a small layer of water in it. The bowl with the chocolate in it should not touch the water, because this could easily burn your chocolate. Bring the water to a very slow simmer on a small burner. Use a silicone spatula to carefully stir the chocolate from time to time, until the chocolate has fully melted. If you stir too vigorously you will create air pockets in your chocolate. Once the water comes to a boil you can turn off the fire, the bowl keeps the warmth trapped so the chocolate will still melt.
♡ Step 6: Take the bowl off of the pan and dry off the bottom with a kitchen towel. Put the bowl on the counter or on a coaster on a table. Be careful when taking the bowl off the pan because of the hot steam escaping and the hot glass bowl.


♡ Step 7: Add the yellow food colouring powder and stir this through the chocolate carefully. Put the chocolate into a piping bag with a small piping nozzle in it, after achieving the desired colour.


♡ Step 8: Fill in the yellow parts for both designs on the acetate or baking paper. Take your time and don’t put too much pressure on the piping bag, because if you do too much chocolate might come out. Tap the cutting board on the table after every time logo you filled the yellow parts of, because the board is cold and otherwise the chocolate will set with air bubbles under it. Put the cutting boards in the refrigerator and wait for the chocolate to set. In the meantime clean the piping nozzle, if you only had one, and dry the piping nozzle with some kitchen paper. You can prepare your next piping bag, in the same fashion you did before, ahead of time.


♡ Step 9: Repeat steps 5 through 8 for all of the other colours: red, blue and white. Make sure you use the right amount of grams of white chocolate! Wait in between every time for the colour to set before you melt the chocolate for the next colour.
TIP: To make sure the bones don’t break off you can go over the joins and bones one more time with the colour you end with. The joins, the dark lines, are pretty easy to break otherwise and it’s a pity if your chocolates break after putting so much effort into them.
♡ Enjoy!
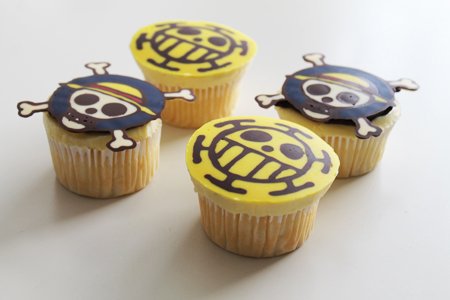
TIP: Use the chocolates as cupcake toppers, decorate a cake with them or stick one on top of cookie, using a little bit of melted chocolate.
Don’t forget to like MuchMunchies on Facebook and subscribe to MuchMunchies’ channel on Youtube for more pictures, videos and recipes!


